
28.04.2013
How to use and extend the library JFXtras
This article describes how to compile the latest version of the JFXtras library in your own IDE so it is possible to debug directly into the source code and make changes which can be contributed to the project. I describe several ways to import and build the JFXtras library with Netbeans, Eclipse, Gradle, the e(fx)clipse plugin and the Eclipse Gradle Integration. Also I explain how to use Git to fork and clone the repository so you can contribute new components or bug fixes to the project.
Contributing code
If you want to contribute code (new components, bugfixes, etc.) , I think the best way is to use Git clone and the Eclipse Gradle Plugin. By using this way you checkout the code, use the standard Gradle build script and don't have to worry about how to create a pull-request with your custom project. If you have forked the JFXtras project on Github before and checkout this fork, it is very easy to commit your changes into the forked repository and create the pull-request. (All steps are listed at the end of the article.)
The following screenshot shows the demo application Ensemble of the JFXtras library. This demo application contains examples of all components which are part of the library.

JFXtras library
The JFXtras library is a collection of nice JavaFX gui components which are currently missing in the standard JavaFX component library of the JDK.
The website of JFXtras library can be found here.
Use the library only
Normally the simplest way is to download the zip package with the latest release of the JFXtras library. You can find a link to this jar on the homepage of the JFXtras project. Or direct here. Another location is the Maven repository at JFXtras Maven.
Use this way if you want the latest release of the library but do not want to debug into the source code.
If you simple want to use components of the library this is the perfect way for you.
Download and build the library with Gradle
Another way to use the library is to download the sources and execute the Gradle build file at the console. The sources can be found on GitHub. On the homepage you find a direct link to the GitHub website which downloads the latest zip package with all sources and a Gradle buildfile.
Use this way if you want the latest version of the library but do not want to debug into the source code.
When you extract the zip file you have to call the Gradle build script and wait until the compilation is finished. The result is a jar file with all necessary binaries you need. This jar file must be included in you project so you can use the components of the JFXtras library.
To execute the Gradle build script you have to open a terminal window and use the following command:
./gradlew build
After the Gradle script has finished the jar file jfxtras-labs-XXX-SNAPSHOT.jar can be found in the sub directory ./build/libs.
Enviroment variable JAVA_HOME
If you did not set the JAVA_HOME or JAVAFX_HOME environment variable an error occurs. Normally it is sufficient that JAVA_HOME is set. The error message of Gradle script is a little bit misleading. If you did not set JAVA_HOME it says that you did not set JAVAFX_HOME. :-( (I will create a Pull-Request for a better error message.)
If you want to set the environment variable JAVA_HOME on a Mac you can use the following command:
export JAVA_HOME=/Library/Java/JavaVirtualMachines/jdk1.7.0_11.jdk/Contents/Home
If you want to check if it was set type the following command:
echo $JAVA_HOME
JavaFX runtime
Normally you find the JavaFX runtime in the lib folder of your JRE. (for OSX: /Library/Java/JavaVirtualMachines/jdk1.7.0_11.jdk/Contents/Home/jre/lib). The name of the jar file is jfxrt.jar.
Download, build and debug the library
If you want to use the latest features of the library and want to debug into the library it is necessary to download the latest version of the library and compile it youself. Don't worry. This is not very difficult.
Download zip
A zip package with the latest sources can be found here: https://github.com/JFXtras/jfxtras-labs.
Clone Git repository
The other way is to clone the Git respository of the JFXtras library. Simply use the following command in a terminal window.
git clone https://github.com/JFXtras/jfxtras-labs.git
Now you have the complete sources of the library with all branches and history informations on your computer. The default branch is 2.2. If you want to switch to the branch 8.0 you have to type the following command:
git checkout 8.0
Keep in mind that the sources are in the sub directory jfxtras-labs. Don't forget to call cd jfxtras-labs if you want to change the branch.

Import sources into the IDE
I describe four ways to compile the sources:
- Eclipse with Gradle Plugin
- Eclipse with a Java project
- Eclipse with the e(fx)clipse plugin
- Netbeans with a standard library project
I recommend the way with Eclipse and the Gradle Plugin. It is the easiest way.
Eclipse Gradle Plugin
First you have to install the Gradle Plugin. It can be found on the website of SpringSource. Here is a description and a link to the Eclipse update site: Eclipse Integration Gradle.
After installing the Gradle integration you have to choose File->Import in the menue bar. In the first wizard step you select Gradle Project.

In the second wizard step you 1. choose the directory with the JFXtras library. 2. build the model and 3. select the Gradle project for the import.

When the import has finished you have a Gradle project in your workspace. After the Gradle build is executed the build artifact (jfxtras-labs-[VERSION].jar) is in the directory ./build/libs.

Problems with JAVA_HOME and JAVAFX_HOME
I had massive problems with setting the environment variable JAVA_HOME. The Gradle plugin didn't find the JavaFX runtime. Setting it in .profile, .bashrc, .login, .. doesn't help. The environment variable was available in the terminal but not in the Gradle integration in Eclipse.
If you have the same problem and get this message
Please set the environment variable JAVA_HOME to the directory that contains jre/lib/jfxrt.jar of JavaFX version 2.2.
simply add the line
ext.javafxJar = "/Library/Java/JavaVirtualMachines/jdk1.7.0_11.jdk/Contents/Home/jre/lib/jfxrt.jar"
in the file build.gradle. (After the first if-else-statement)
That it is. In section Use the library I describe, how to use the library.
Create workspace manually
If you want to create your workspace manually you have to do the following things. (I do not recommend this way. It's a quickhack if you want to test something or don't like Gradle.)
Generally you have to create the following source folders in your IDE:
/src/main/java: for the Java files/src/resources: for the images, css, .../test/java: for the JUnit tests
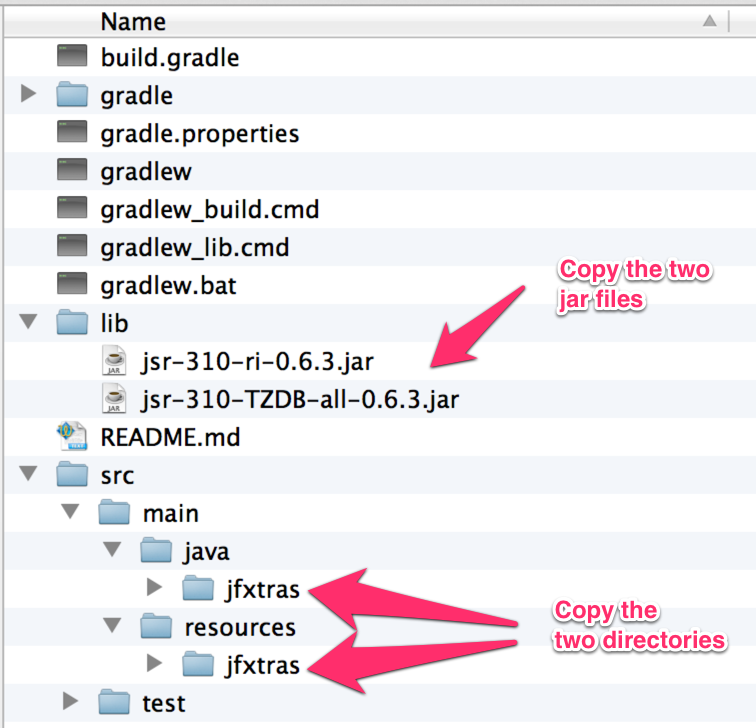
If you only want to compile the library without the JUnit tests you only need the following two jar files, which are part of the package you downloaded before:
jsr-310-ri-0.6.3.jarjsr-310-TZDB-all-0.6.3.jar
The JSR-310 is the Date & Time API. (More informations and download).
If you want to compile the JUnit tests, too, you need some jar files from the GUI testing framework Jemmy. Also you need the JUnit framework and Hamcrest.
hamcrest-core-1.1.jarjunit-4.8.1.jarJemmy2-0.9.3-SNAPSHOT.jarJemmy3AWT-0.9.3-SNAPSHOT.jarJemmy3AWTInput-0.9.3-SNAPSHOT.jarJemmy3Browser-0.9.3-SNAPSHOT.jarJemmy3Core-0.9.3-SNAPSHOT.jarJemmyFX-0.9.3-SNAPSHOT.jar
Jar files
An easy why to get the jar files is to run the Gradle script. Gradle download all necessary jar files into the folder /Users/[USERNAME]/.gradle/caches/artifacts-13/filestore/.
If you extract the downloaded zip file you can copy the files from the src directory into you IDE.
If you want to use Eclipse you have to create a standard Java project and add the sources, the two libraries and include the JavaFX runtime.

With the e(fx)clipse Eclipse plugin you have to create a JavaFX library project and add the sources. (The JavaFX runtime is added by the plugin.)

With Netbeans you create a standard library project Java Class Library and add the sources, the libraries and include the JavaFX runtime.

I don't like the handling of the Source folders in Netbeans and think it is more confusing than in Eclipse. If you feel the same and don't want to create the subfolders for the sources you can copy src/main/java/jfxtras and src/resource/jfxtras into the same source folder and omit the tests. This compiles, too and is sometimes sufficient.

Use the library
That's all. Now you can create a JavaFX project in you IDE and set a dependency to the JFXtras library project, use all components and debug into the classes of the library. If you want to check if everything is ok, I recommend the JFXtras Ensemble project: JFXtras Ensemble. This is a demo application which uses all components of the JFXtras library and contains code snippets which shows how to use the components.
The following screenshot shows this demo application.

If you want to compile it yourself the way is the same as for the JFXtras Library. Create a Project, copy the sources into the project and include the jar files. (Keep in mind to create JavaFX projects.)
Example:
First you create a new e(fx)clipse project and set a dependency in the Java Build Path to the Gradle project jfxtras labs.

If you want to use the Odometer component select this component in the Ensemble and click on the Source Code tab.

There you can copy the example source code of the component and paste it into a new class file with the name OdometerGaugesSample in the e(fx)clipse project. The sample code contains a main method so it is possible to start the example as Java Application.

For the other example components it is the same.
Recommended way
I think the easiest way to constribute code is to follow these steps:
- Fork JFXtras project on Github
- Clone JFXtras project with Git into local repository
- Import project into Eclipse with the Gradle plugin
- Create new components or fix bugs
- Commit into your forked repository
- Create a pull-request on Github