
17.03.2013
JavaFX - Dartboard with Shapes (Path, Arc, ArcTo, Circle) and Text
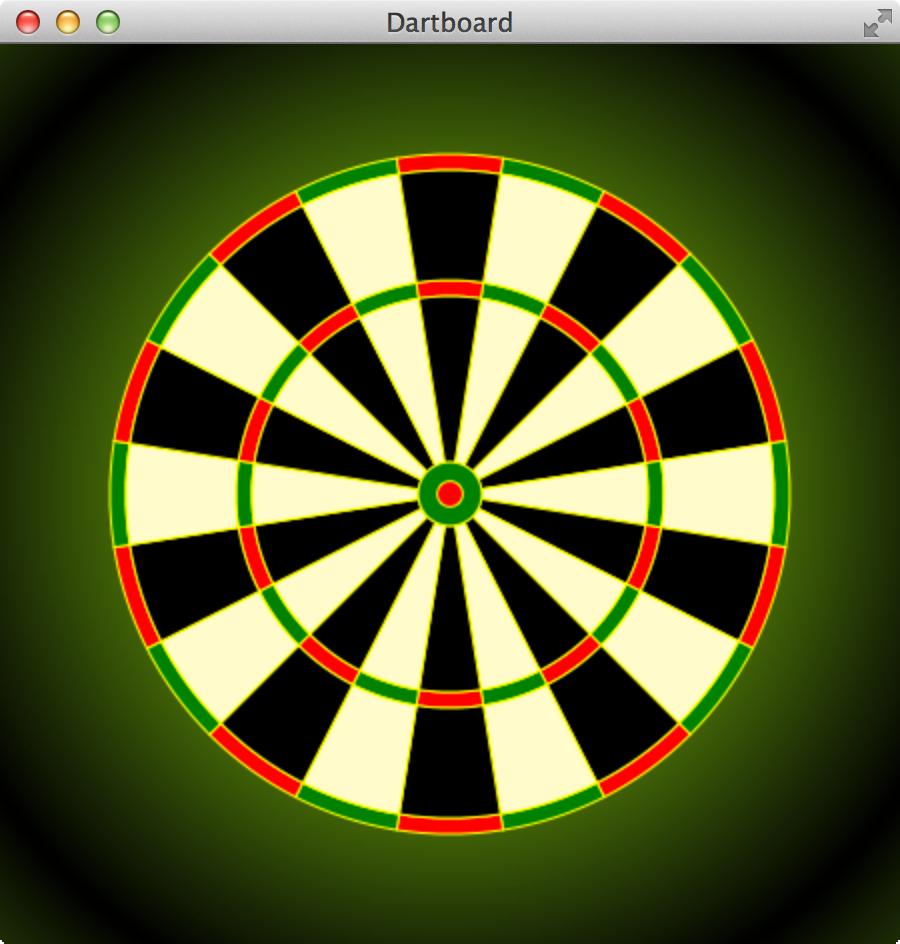
The following article describes how to paint a dartboard with JavaFX. This article tries to describe how to use primitive shapes to paint a complex Scene with JavaFX. A side-effect is that you will learn how to use trigonometric functions like sine and cosine and place points at an arbitrary position on a circle. In the example, a Scene is created which contains some javafx.scene.shape.Circle objects, javafx.scene.shape.Arc objects and javafx.scene.shape.Path objects (with javafx.scene.shape.ArcTo, javafx.scene.shape.MoveTo and javafx.scene.shape.LineTo). The objects are created with the associated Builder classes (javafx.scene.shape.ArcBuilder, javafx.scene.shape.ArcToBuilder, javafx.scene.shape.CircleBuilder, javafx.scene.shape.PathBuilder. To display the numbers around the board the class javafx.scene.text.Text is used. The appearence of the dartboard can be adapted by changing the CSS file.
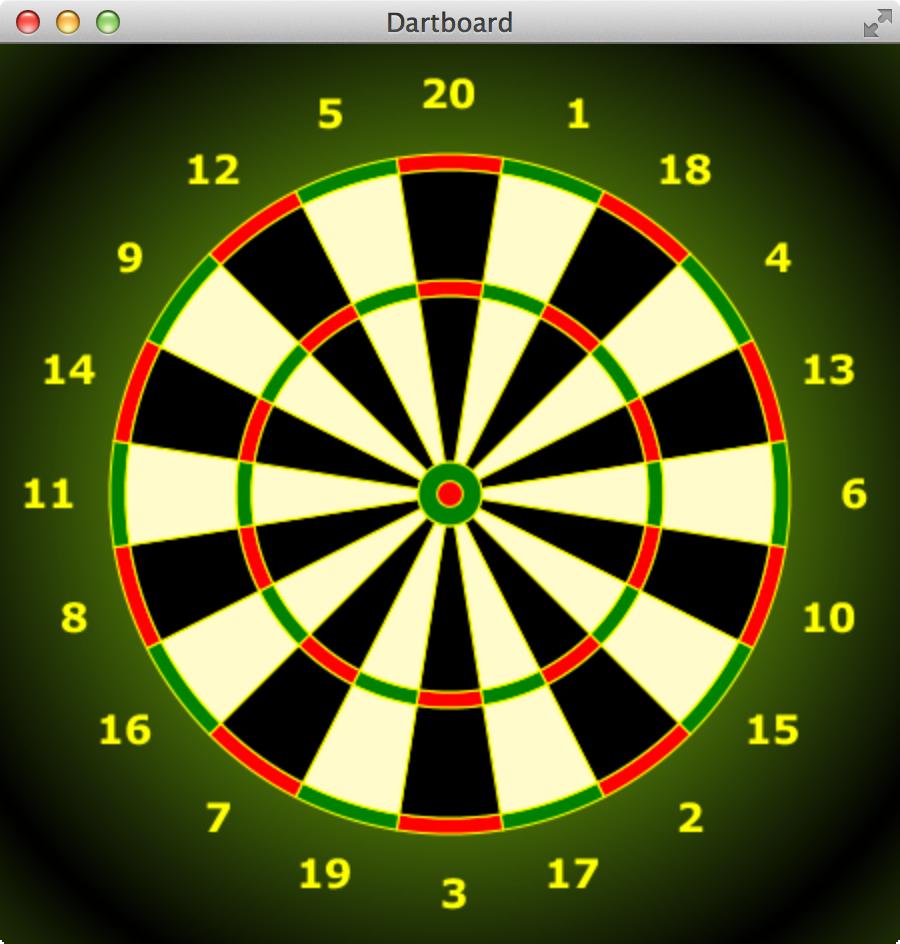
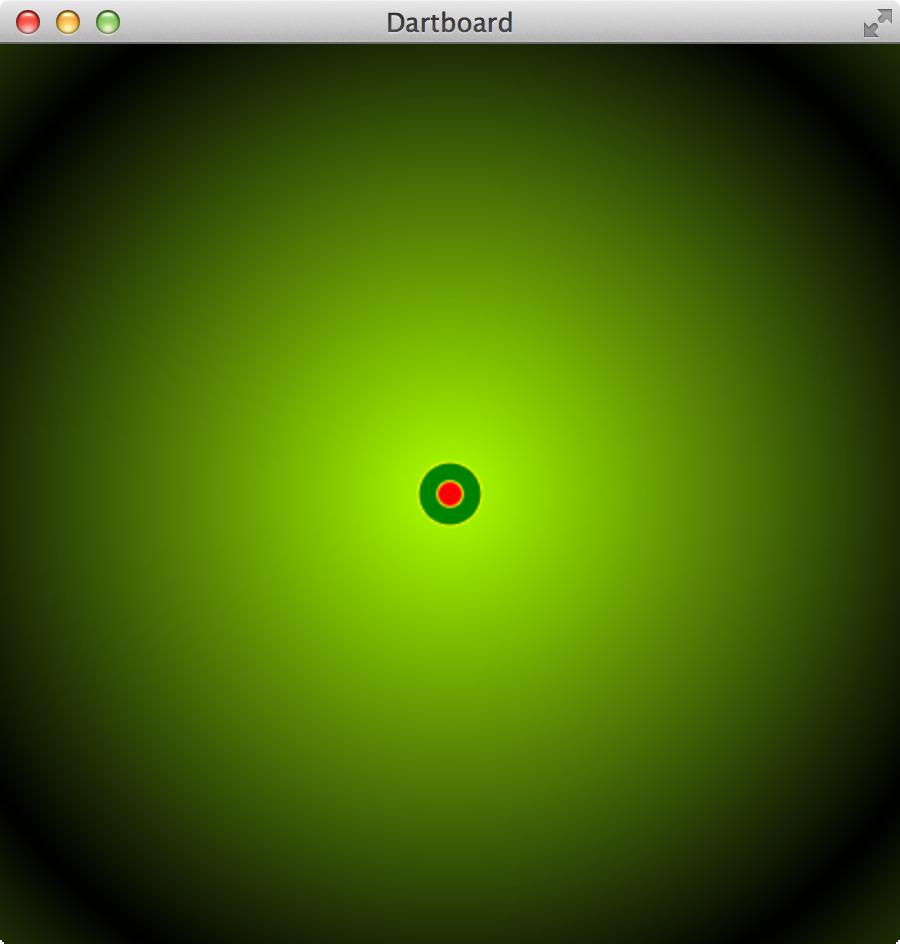
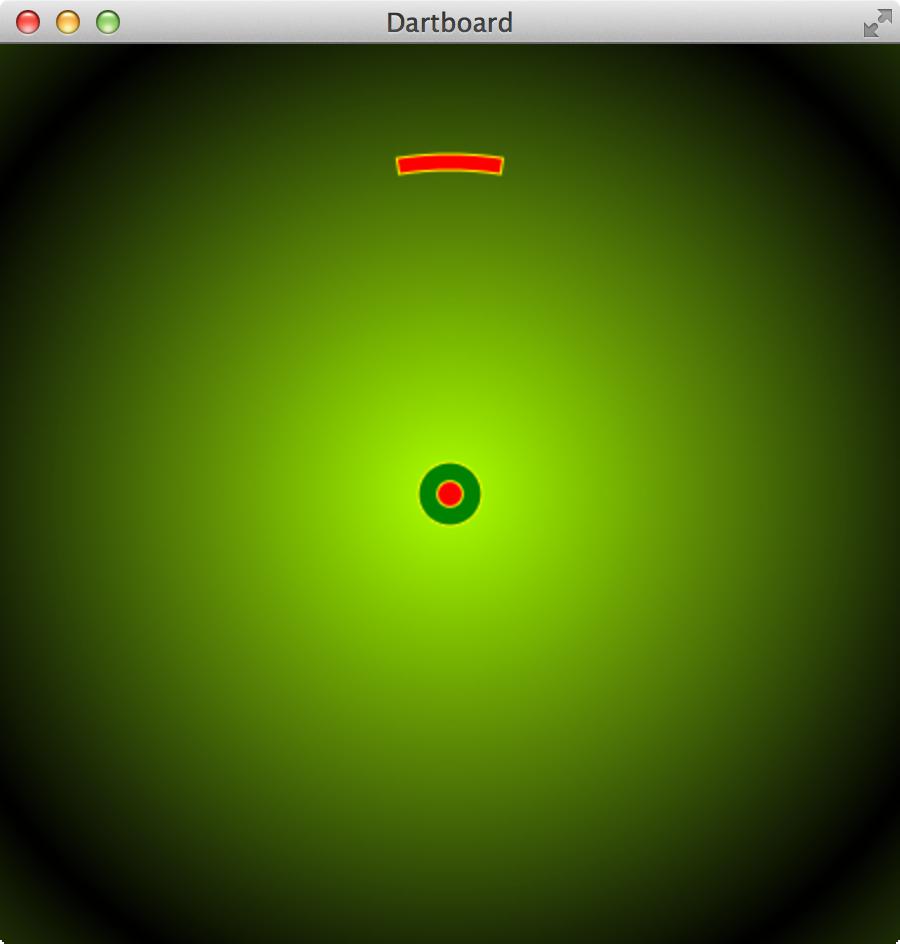
The following screenshots show the finished JavaFX application. Only by a changing the CSS file the style of the application looks like an electronic dartboard.
Because the trigonometry, which is used in the example, might be a little bit confusing, the dartboard will be created step by step. I.e. I will divide the drawing process in the following steps:
- Create a
Stagewith aSceneandPaneand a radial gradient background color. - Paint the border around the Bull and the Bulls Eye with
Circleobjects. - Paint the Bull and the Bulls eye with two
Arcobjects. - Paint a single field of the dartboard with a
Pathand explain the usage of sine and cosine. - Place the fields of the dartboard at the correct position.
- Paint the numbers around the board with
Textobjects.
Create a Stage with a Scene and a Pane
In the first step we create a Stage with a Scene and a Pane with a radial gradient background color.
package org.hameister.javafx.dartboard;

import javafx.application.Application;
import javafx.scene.Scene;
import javafx.scene.layout.Pane;
import javafx.stage.Stage;

public class JavaFXDartBoard extends Application {

    // Base for the board size is 400px
    // The FACTOR_SIZE can be used to change the size of the board
    private final static double FACTOR_SIZE = 1.0d;
    private final static double BORDER_SIZE = 50;
    private final static double WIDTH = (400 + BORDER_SIZE) * FACTOR_SIZE;
    private final static double HEIGHT = (400 + BORDER_SIZE) * FACTOR_SIZE;

    @Override
    public void start(Stage primaryStage) {
        Pane root = new Pane();

        Scene scene = new Scene(root, WIDTH, HEIGHT);

        primaryStage.setTitle("Dartboard");
        primaryStage.setScene(scene);
        primaryStage.getScene().getStylesheets().add("dartboard");
        primaryStage.show();
    }


    public static void main(String[] args) {
        launch(args);
    }
}
The constants FACTOR_SIZE and BORDER_SIZE will be used later to resize the dartboard. The basesize of the board is 400px.
The CSS file dartboard.css is listed here:
.root {
    -fx-background-color: radial-gradient(center 50% 50%, radius 60%, reflect, #ADFF2F, black );
}
Border around the Bull and the Bulls Eye
In the next step we draw two yellow circles in the middle of the board. These circles are the border for the Bull and the Bulls Eye.
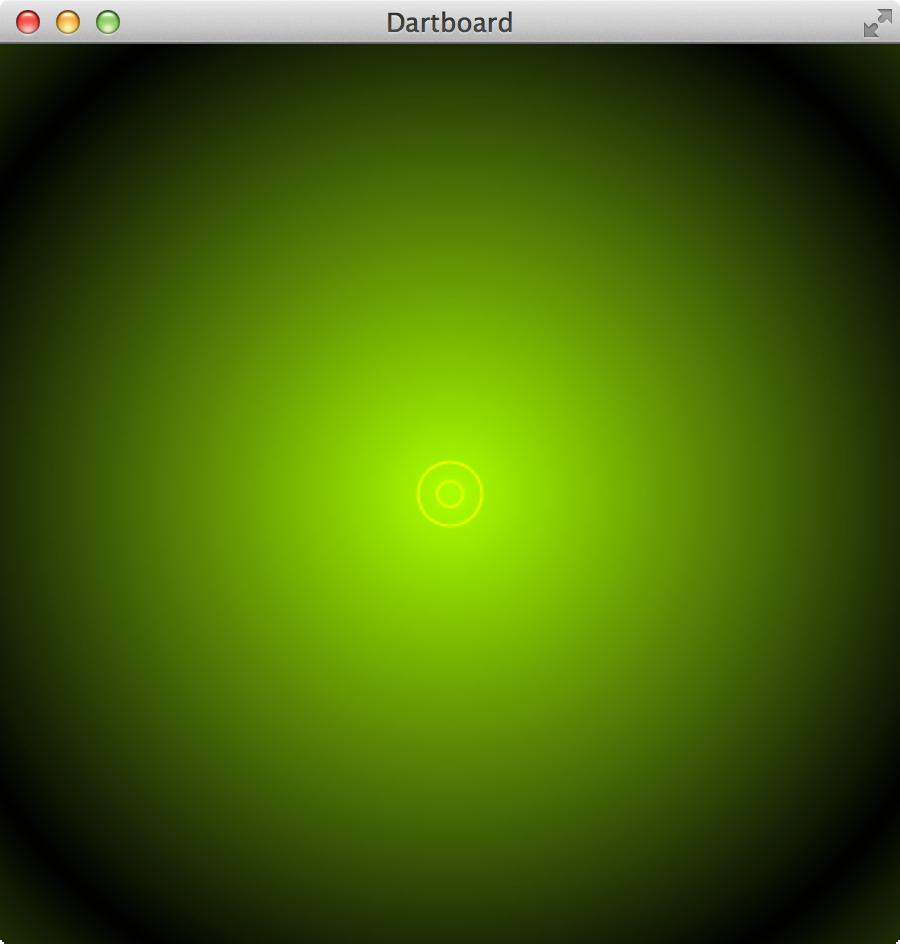
To create a Circle around the Bull and the Bulls Eye you must add the marked lines into the class JavaFXDartBoard:
...

public class JavaFXDartBoard extends Application {

...
    // Size of the Bull
    private static double BULL = (31.8d / 2) * FACTOR_SIZE;
    // Size if the Bulls Eye
    private static double BULLS_EYE = (12.7d / 2) * FACTOR_SIZE;
    private static double CENTER_X = WIDTH / 2;
    private static double CENTER_Y = HEIGHT / 2;

    @Override
    public void start(Stage primaryStage) {
        Pane root = new Pane();

        //Yellow circles around Bull
        root.getChildren().add(CircleBuilder
                .create()
                .centerX(CENTER_X)
                .centerY(CENTER_Y)
                .radius(BULL)
                .styleClass("border-line")
                .build());

        //Yellow circles around Bulls eye
        root.getChildren().add(CircleBuilder
                .create()
                .centerX(CENTER_X)
                .centerY(CENTER_Y)
                .radius(BULLS_EYE)
                .styleClass("border-line")
                .build());


        Scene scene = new Scene(root, WIDTH, HEIGHT);

...
    }

...
}
The constants CENTER_X and CENTER_Y define the middlepoint of the Scene. For the creation of a Circle a CircleBuilder is used. The created Circle is directly added to the root Pane of the application. The style for the border-line is read from the CSS file dartboard.css.
So you have to add the following lines of code to the CSS file:
.border-line {
    -fx-stroke: yellow;
    -fx-stroke-width: 1;
    -fx-fill: null;
}
It is important to set -fx-fill: null because the default fill color ist black. If you want no fill color you must change it to the value null.
Paint the Bull and the Bulls eye with two Arc objects
In this step the Bull and the Bulls eye is painted into the dartboard by using two Arc objects.
...

public class JavaFXDartBoard extends Application {

...
    // Size of the Bull
    private static double BULL = (31.8d / 2) * FACTOR_SIZE;
    // Size if the Bulls Eye
    private static double BULLS_EYE = (12.7d / 2) * FACTOR_SIZE;
    private static double CENTER_X = WIDTH / 2;
    private static double CENTER_Y = HEIGHT / 2;

    @Override
    public void start(Stage primaryStage) {
        Pane root = new Pane();

        // Create Bull
        root.getChildren().add(ArcBuilder.create()
                .centerX(CENTER_X)
                .centerY(CENTER_Y)
                .type(ArcType.OPEN)
                .radiusX(BULL)
                .radiusY(BULL)
                .strokeWidth(BULL - BULLS_EYE)
                .styleClass("bull-style")
                .length(360) // Full circle; 360 degrees
                .build());

        // Create Bulls Eye
        root.getChildren().add(ArcBuilder
                .create()
                .centerX(CENTER_X)
                .centerY(CENTER_Y)
                .type(ArcType.OPEN)
                .radiusX(BULLS_EYE)
                .radiusY(BULLS_EYE)
                .strokeWidth(BULLS_EYE)
                .styleClass("bulls-eye-style")
                .length(360) // Full circle; 360 degrees
                .build());

...

        Scene scene = new Scene(root, WIDTH, HEIGHT);

...
    }

...
}
For the creation of the filled Circles is an ArcBuilder used. The created Arc is directly added to the root Pane of the application. The style for the bulls-eye-style and bull-style is read from the CSS file dartboard.css. To fill the Arcs with a color the stroke width is used. The function strokeWidth is called with the size of the Bull and Bulls Eye.
Also you have to add the following lines of code to the CSS file to define the stroke color for the Arcs:
.bull-style {
    -fx-stroke: green;
    -fx-stroke-type: inside;
}

.bulls-eye-style {
    -fx-stroke: red;
    -fx-stroke-type: inside;
}
Note: To paint the Bull and the Bulls eye with its border an Arc and a Circle is used. The reason for that is, that I want to explain both classes. A simpler way is to use a Circle which is filled with a color.
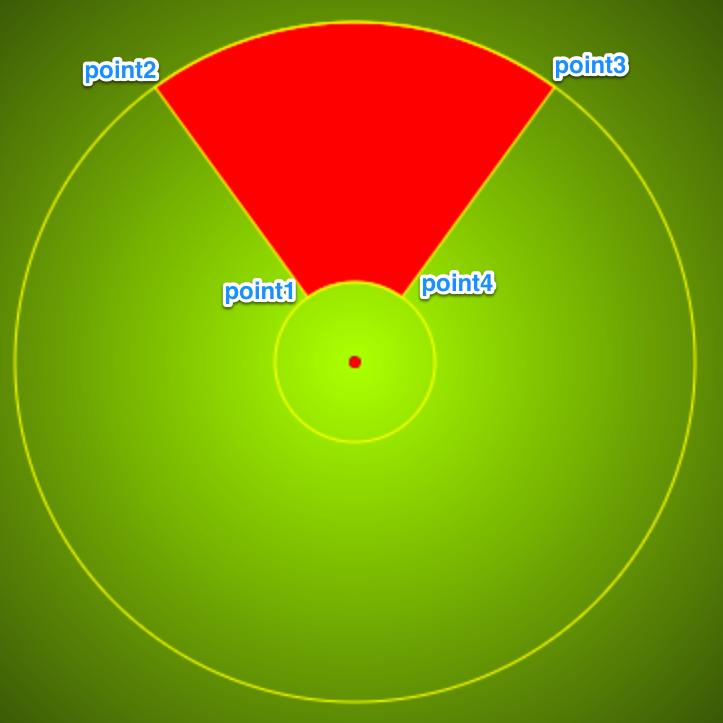
Paint a single field into the dartboard with a Path
Now we will create a method to paint one field into the dartboard using a Path. The important part of this step is to determine the four edges of the field you want to draw.
But first we need a little bit of trigonometry with sine and cosine :-)
The following screenshot shows a very big dartboard field. It is placed between two circles. When you want to paint this field you have to determine the 4 points on the circles. For every point you need the x-coordinate and the y-coordinate.
The equation to calculate points on a circle looks like this:
x = CENTER_X + radius * sin(angle)
y = CENTER_Y - radius * cos(angle)
We need the middlepoint CENTER_X, a radius and an angle. With these values it is possible to calculate the four points, which are necessary to paint the field.
You have to keep in mind that the angle is defined in radians. But we want to use degrees in our application. So we have to transform the degrees to radians. This can be achieved with the following equation:
a(deg)   a(rad)
------ = ------
360°      2*PI

         a(deg) * PI
a(rad) = -----------
             180°
Further information about a Circle can be found here.
Later I recognized that there is a method Math.toRadians(angleAlpha); which transforms an angle from degrees to radians. :-) I like the π version. ;-)
To determine the first point (pointX1, pointY1) we need the innerRadius and the angleAlpha which is between the left purple line with the text innerRadius and the blue line in the middle. Also it is important to move the coordinate to the center of the Scence because the coordinate system has its origin in the left upper corner (CENTER_X, CENTER_Y).
The other points can be calculated in the same way. But you have to notice that the points on the right side need the angleAlphaNext.
The following figure shows all informations (points, angles, variable names, ...):
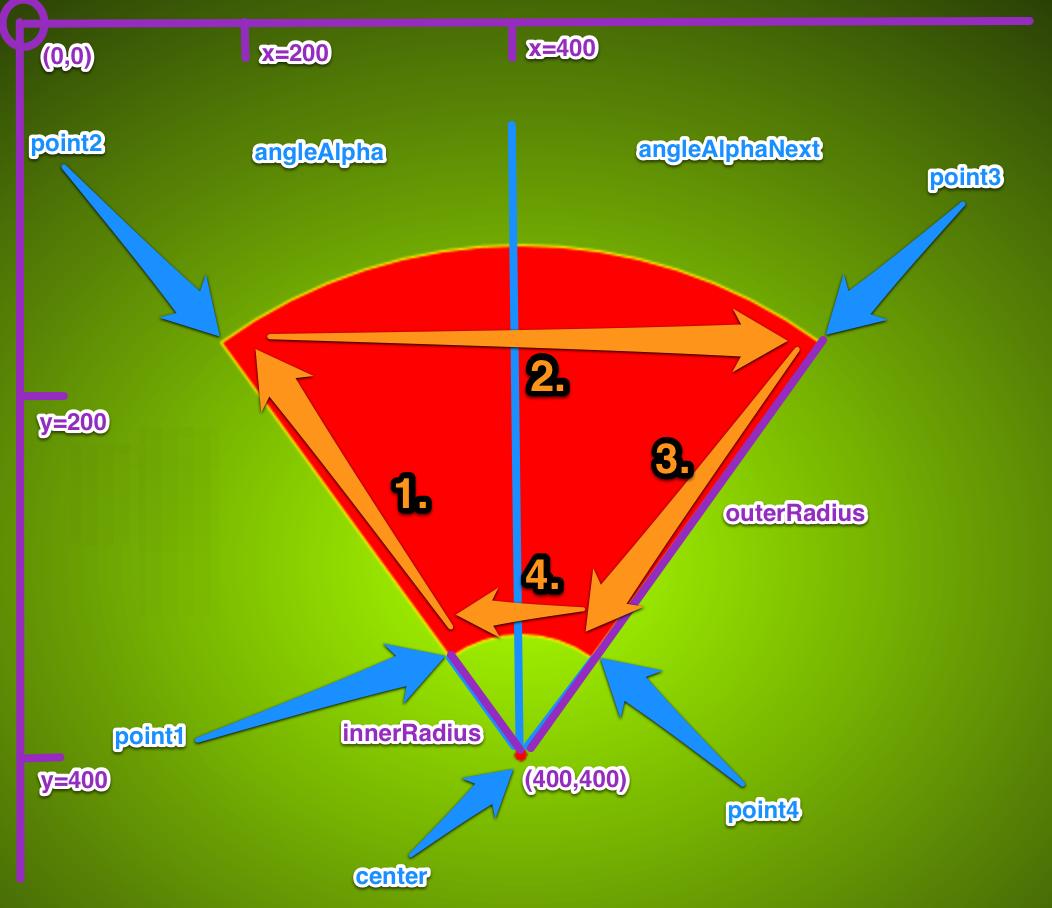
With these informations we can create a function which calcutates the two angles and the four points. And use them to draw the field on the dartboard.
For the drawing we use a PathBuilder to create a Path. Important are the elements of the Path.
First, a kind of pencil is moved to point1 with the MoveTo element. Then a line is drawn to point2 with LineTo (orange arrow with number 1 figure above). At point2 an ArcTo element is needed to reach point3 (orange arrow with number 2 figure above). So we build this element with an ArcToBuilder. Important is the sweetFlag which indicates the direction of the Arc, i.e. if the Arc is above the imaginary line between point2 and point3. When point3 is reached a line is drawn to point4 with a LineTo element (orange arrow with number 3 figure above). At the end we paint an other Arc to the start point point1 with an ArcTo element (orange arrow with number 4 figure above). Please note that the sweepFlag is false now.
private Path createDartboardField(double degreeStart, double degreeEnd, double innerRadius, double outerRadius, String style) {
    double angleAlpha = degreeStart * (Math.PI / 180);
    double angleAlphaNext = degreeEnd * (Math.PI / 180);

    //Point 1
    double pointX1 = CENTER_X + innerRadius * Math.sin(angleAlpha);
    double pointY1 = CENTER_Y - innerRadius * Math.cos(angleAlpha);

    //Point 2
    double pointX2 = CENTER_X + outerRadius * Math.sin(angleAlpha);
    double pointY2 = CENTER_Y - outerRadius * Math.cos(angleAlpha);

    //Point 3
    double pointX3 = CENTER_X + outerRadius * Math.sin(angleAlphaNext);
    double pointY3 = CENTER_Y - outerRadius * Math.cos(angleAlphaNext);

    //Point 4
    double pointX4 = CENTER_X + innerRadius * Math.sin(angleAlphaNext);
    double pointY4 = CENTER_Y - innerRadius * Math.cos(angleAlphaNext);

    Path path = PathBuilder.create()
            .styleClass(style)
            .elements(
            new MoveTo(pointX1, pointY1), // Move to Point 1
            new LineTo(pointX2, pointY2), // Draw a Line to Point 2
            ArcToBuilder.create()         // Draw an Arc to Point 3
                  .radiusX(outerRadius)
                  .radiusY(outerRadius)
                  .x(pointX3)
                  .y(pointY3)
                  .sweepFlag(true)
                  .build(),
            new LineTo(pointX4, pointY4), // Draw a Line to Point 4
            ArcToBuilder.create()         // Draw an Arc back to Point 1
                  .radiusX(innerRadius)
                  .radiusY(innerRadius)
                  .x(pointX1)
                  .y(pointY1)
                  .sweepFlag(false)
                  .build())
            .build();
    return path;
}
Note that the style for the dartboard fields are dymamic. The parameter style is used to change the styling of the fields.
With this method we are able to paint all dartboard fields.
If you want to check, if the method works you can add the following source code to the start method:
// Create double rings
root.getChildren().add(
        createDartboardField(root,
        -72, // Start angle
        72,  // End angle
        40, // Radius start
        170, // Radius end
        "double-triple-style-red"));
(double-triple-style-red must be part of the CSS file. An example can be found in the next section.)
Place the fields of the dartboard at the correct position.
Now we draw all dartboard fields into the dartboard. With the correct position and color.
First we divide the dartboard into 20 pies. Every pie has an angle of 18 degrees (360°/20=18°).
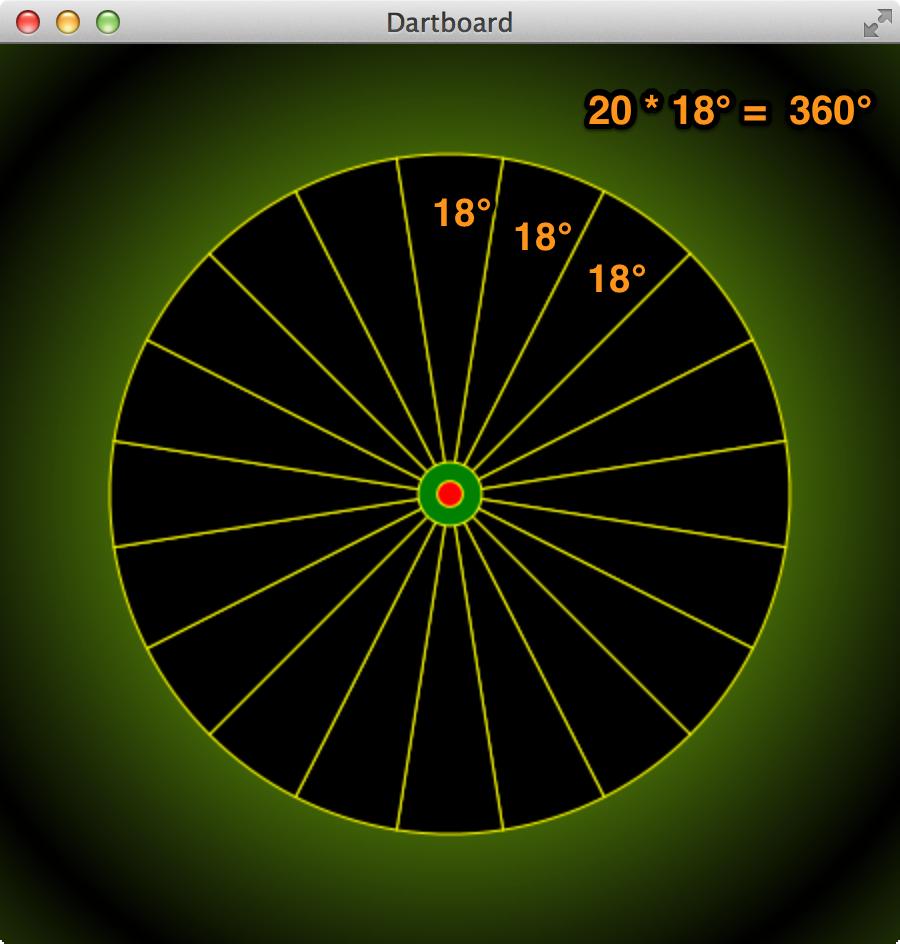
So we have to draw 20 pies where every pie has four fields. Please note that every pie needs an offset of 9° because the pie for the number 20 does not start with an angle of 0°. It starts with an offset of 9°.
For every pie four fields are created by calling the function createDartboardField. The styling of the fields is done with the variables doubleTripleStyle and fieldStyle. These variables use values which are defined in the CSS file.
private static double OUTER_DOUBLE_RING = 170.0d * FACTOR_SIZE;
private static double INNER_DOUBLE_RING = 162.0d * FACTOR_SIZE;
private static double OUTER_TRIPLE_RING = 107.0d * FACTOR_SIZE;
private static double INNER_TRIPLE_RING = 99.0d * FACTOR_SIZE;
private final static int ROTATE_ANGLE_DEGREES = 18; // 18 Degrees per field
private static int ROTATE_ANGLE_DEGREES_OFFSET = ROTATE_ANGLE_DEGREES / 2; // 9 degree offset per field

...

    public void start(Stage primaryStage) {
        Pane root = new Pane();

        String doubleTripleStyle;
        String fieldStyle;

        for (int i = 0; i < 20; i++) {
            if (i % 2 == 0) {
                doubleTripleStyle = "double-triple-style-green";
                fieldStyle = "field-style-light";
            } else {
                doubleTripleStyle = "double-triple-style-red";
                fieldStyle = "field-style-dark";
            }

            // Create double rings
            root.getChildren().add(
                    createDartboardField(
                    i * ROTATE_ANGLE_DEGREES + ROTATE_ANGLE_DEGREES_OFFSET,
                    (i + 1) * ROTATE_ANGLE_DEGREES + ROTATE_ANGLE_DEGREES_OFFSET,
                    INNER_DOUBLE_RING,
                    OUTER_DOUBLE_RING,
                    doubleTripleStyle));

            // Create triple rings
            root.getChildren().add(
                    createDartboardField(
                    i * ROTATE_ANGLE_DEGREES + ROTATE_ANGLE_DEGREES_OFFSET,
                    (i + 1) * ROTATE_ANGLE_DEGREES + ROTATE_ANGLE_DEGREES_OFFSET,
                    INNER_TRIPLE_RING,
                    OUTER_TRIPLE_RING,
                    doubleTripleStyle));

            // Create outer fields
            root.getChildren().add(
                    createDartboardField(
                    i * ROTATE_ANGLE_DEGREES + ROTATE_ANGLE_DEGREES_OFFSET,
                    (i + 1) * ROTATE_ANGLE_DEGREES + ROTATE_ANGLE_DEGREES_OFFSET,
                    OUTER_TRIPLE_RING,
                    INNER_DOUBLE_RING,
                    fieldStyle));

            // Create inner fields
            root.getChildren().add(
                    createDartboardField(
                    i * ROTATE_ANGLE_DEGREES + ROTATE_ANGLE_DEGREES_OFFSET,
                    (i + 1) * ROTATE_ANGLE_DEGREES + ROTATE_ANGLE_DEGREES_OFFSET,
                    BULL,
                    INNER_TRIPLE_RING,
                    fieldStyle));

        }

...

    }
The CSS file contains the definitions for the styling of the fields:
.double-triple-style-red {
    -fx-fill: red;
    -fx-stroke: yellow;
    -fx-stroke-width: 1;
}

.double-triple-style-green {
    -fx-fill: green;
    -fx-stroke: yellow;
    -fx-stroke-width: 1;
}

.field-style-dark {
    -fx-fill: black;
    -fx-stroke: yellow;
    -fx-stroke-width: 1;
}

.field-style-light {
    -fx-fill: lemonchiffon;
    -fx-stroke: yellow;
    -fx-stroke-width: 1;
}
Paint the numbers around the board with Text objects.
The last step is placing the numbers around the dartboard.
First the numbers and the font size are defined at the top of the class.
private static final String[] DARTBOARD_NUMBERS =
            {"20", "1", "18", "4", "13",
             "6", "10", "15", "2", "17",
             "3", "19", "7", "16", "8",
             "11", "14", "9", "12", "5"
            };
private static final int FONT_SIZE = 20;
After that we implement a function paintNumbers which places Text objects around the dartboard.
private void paintNumbers(Pane root) {
    TextBuilder textBuilder = TextBuilder.create()
            .font(Font.font("Verdana", FontWeight.BOLD, FONT_SIZE * FACTOR_SIZE))
            .styleClass("text-surround");

    for (int i = 0; i < DARTBOARD_NUMBERS.length; i++) {
        double degreeStart = i * ROTATE_ANGLE_DEGREES;
        double angleAlpha = degreeStart * (Math.PI / 180);

        double pointX1 = CENTER_X + POSITION_NUMBERS * Math.sin(angleAlpha)
                - calculateTextOffsetX(DARTBOARD_NUMBERS[i], FONT_SIZE);
        double pointY1 = CENTER_Y - POSITION_NUMBERS * Math.cos(angleAlpha)
                + calculateTextOffsetY(FONT_SIZE);

        root.getChildren().add(textBuilder.x(pointX1).y(pointY1).text(DARTBOARD_NUMBERS[i]).build());
    }
}
The approach to determine the coordinates for the number is the same like calculating the coordinates for the dartboard fields. You need an angleAlpha which is used to calculate pointX1 and pointY1. These coordinates are used to place the Text object which is created with a TextBuilder.
The problem with the coordinates of the Text is that the origin of a Text object is at the left lower corner. So you need to determine the middlepoint of the Text object. Depending on the font size and the length of the number. So we implement the following two functions to calculate an offset for the text. (These two methods are not perfect, but they work for this application. :-) )
    /**
     * Find the center on the X-Axis of the text. Is used to position the text
     * at the correct x position on the board.
     */
    private double calculateTextOffsetX(String text, double fontSize) {
        return ((text.length()) / 2) + fontSize * 0.5;
    }

    /**
     * Find the center on the Y-Axis of the text. Is used to position the text
     * at the correct y position on the board.
     */
    private double calculateTextOffsetY(double fontSize) {
        return (fontSize / 2) - fontSize * 0.4;
    }
Keep in mind that the font-size of a number can be overwritten with variable fx-font-size in the CSS file:
.text-surround {
    -fx-fill: yellow;
    -fx-font-family: Verdana;
    -fx-font-weight: bold;
    -fx-font-size: 20;
}
If you want to test the function paintNumbers you have to add the method call in the method start.
Finished Dartboard Application
Now the application is finished. Here is the complete source code of the dartboard application:
package org.hameister.javafx.dartboard;

import javafx.application.Application;
import javafx.scene.Scene;
import javafx.scene.layout.Pane;
import javafx.scene.shape.ArcBuilder;
import javafx.scene.shape.ArcToBuilder;
import javafx.scene.shape.ArcType;
import javafx.scene.shape.CircleBuilder;
import javafx.scene.shape.LineTo;
import javafx.scene.shape.MoveTo;
import javafx.scene.shape.Path;
import javafx.scene.shape.PathBuilder;
import javafx.scene.text.Font;
import javafx.scene.text.FontWeight;
import javafx.scene.text.TextBuilder;
import javafx.stage.Stage;

/**
 *
 * @author hameister
 */
public class JavaFXDartBoard extends Application {

    // Base for the board size is 400px
    // The FACTOR_SIZE can be used to change the size of the board
    private final static double FACTOR_SIZE = 1.0d;
    private final static double BORDER_SIZE = 50;
    private final static double WIDTH = (400 + BORDER_SIZE) * FACTOR_SIZE;
    private final static double HEIGHT = (400 + BORDER_SIZE) * FACTOR_SIZE;
    private static double OUTER_DOUBLE_RING = 170.0d * FACTOR_SIZE;
    private static double INNER_DOUBLE_RING = 162.0d * FACTOR_SIZE;
    private static double OUTER_TRIPLE_RING = 107.0d * FACTOR_SIZE;
    private static double INNER_TRIPLE_RING = 99.0d * FACTOR_SIZE;
    private static double BULL = (31.8d / 2) * FACTOR_SIZE;
    private static double BULLS_EYE = (12.7d / 2) * FACTOR_SIZE;
    private static double CENTER_X = WIDTH / 2;
    private static double CENTER_Y = HEIGHT / 2;
    private static double POSITION_NUMBERS = 200 * FACTOR_SIZE;
    private final static int ROTATE_ANGLE_DEGREES = 18; // 18 Degrees per field
    private static int ROTATE_ANGLE_DEGREES_OFFSET = ROTATE_ANGLE_DEGREES / 2; // 9 Degrees per field
    private static final String[] DARTBOARD_NUMBERS = {
                    "20", "1", "18", "4", "13",
                    "6", "10", "15", "2", "17",
                    "3", "19", "7", "16", "8",
                    "11", "14", "9", "12", "5"
                   };
    private static final int FONT_SIZE = 20;

    @Override
    public void start(Stage primaryStage) {
        Pane root = new Pane();

        String doubleTripleStyle;
        String fieldStyle;

        for (int i = 0; i < DARTBOARD_NUMBERS.length; i++) {
            if (i % 2 == 0) {
                doubleTripleStyle = "double-triple-style-green";
                fieldStyle = "field-style-light";
            } else {
                doubleTripleStyle = "double-triple-style-red";
                fieldStyle = "field-style-dark";
            }

            // Create double rings
            root.getChildren().add(
                    createDartboardField(
                    i * ROTATE_ANGLE_DEGREES + ROTATE_ANGLE_DEGREES_OFFSET,
                    (i + 1) * ROTATE_ANGLE_DEGREES + ROTATE_ANGLE_DEGREES_OFFSET,
                    INNER_DOUBLE_RING,
                    OUTER_DOUBLE_RING,
                    doubleTripleStyle));

            // Create triple rings
            root.getChildren().add(
                    createDartboardField(
                    i * ROTATE_ANGLE_DEGREES + ROTATE_ANGLE_DEGREES_OFFSET,
                    (i + 1) * ROTATE_ANGLE_DEGREES + ROTATE_ANGLE_DEGREES_OFFSET,
                    INNER_TRIPLE_RING,
                    OUTER_TRIPLE_RING,
                    doubleTripleStyle));

            // Create outer fields
            root.getChildren().add(
                    createDartboardField(
                    i * ROTATE_ANGLE_DEGREES + ROTATE_ANGLE_DEGREES_OFFSET,
                    (i + 1) * ROTATE_ANGLE_DEGREES + ROTATE_ANGLE_DEGREES_OFFSET,
                    OUTER_TRIPLE_RING,
                    INNER_DOUBLE_RING,
                    fieldStyle));

            // Create inner fields
            root.getChildren().add(
                    createDartboardField(
                    i * ROTATE_ANGLE_DEGREES + ROTATE_ANGLE_DEGREES_OFFSET,
                    (i + 1) * ROTATE_ANGLE_DEGREES + ROTATE_ANGLE_DEGREES_OFFSET,
                    BULL,
                    INNER_TRIPLE_RING,
                    fieldStyle));
        }

        // Create Bull
        root.getChildren().add(ArcBuilder.create()
                .centerX(CENTER_X)
                .centerY(CENTER_Y)
                .type(ArcType.OPEN)
                .radiusX(BULL)
                .radiusY(BULL)
                .strokeWidth(BULL - BULLS_EYE)
                .styleClass("bull-style")
                .length(360)
                .build());

        // Create Bulls Eye
        root.getChildren().add(ArcBuilder
                .create()
                .centerX(CENTER_X)
                .centerY(CENTER_Y)
                .type(ArcType.OPEN)
                .radiusX(BULLS_EYE)
                .radiusY(BULLS_EYE)
                .strokeWidth(BULLS_EYE)
                .styleClass("bulls-eye-style")
                .length(360)
                .build());

        //Yellow circles around Bull
        root.getChildren().add(CircleBuilder
                .create()
                .centerX(CENTER_X)
                .centerY(CENTER_Y)
                .radius(BULL)
                .styleClass("border-line")
                .build());

        //Yellow circles around Bulls eye
        root.getChildren().add(CircleBuilder
                .create()
                .centerX(CENTER_X)
                .centerY(CENTER_Y)
                .radius(BULLS_EYE)
                .styleClass("border-line")
                .build());


        paintNumbers(root);

        Scene scene = new Scene(root, WIDTH, HEIGHT);

        primaryStage.setTitle("Dartboard");
        primaryStage.setScene(scene);
        primaryStage.getScene().getStylesheets().add("dartboard");
        primaryStage.show();
    }

    /**
     * Find the center on the X-Axis of the text. Is used to position the text
     * at the correct x position on the board.
     */
    private double calculateTextOffsetX(String text, double fontSize) {
        return (text.length() / 2) + fontSize * 0.5;
    }

    /**
     * Find the center on the Y-Axis of the text. Is used to position the text
     * at the correct y position on the board.
     */
    private double calculateTextOffsetY(double fontSize) {
        return (fontSize / 2) - fontSize * 0.4;
    }

    private void paintNumbers(Pane root) {
        TextBuilder textBuilder = TextBuilder.create()
                .font(Font.font("Verdana", FontWeight.BOLD, FONT_SIZE * FACTOR_SIZE))
                .styleClass("text-surround");

        for (int i = 0; i < DARTBOARD_NUMBERS.length; i++) {
            double degreeStart = i * ROTATE_ANGLE_DEGREES;
            double angleAlpha = degreeStart * (Math.PI / 180);

            double pointX1 = CENTER_X + POSITION_NUMBERS * Math.sin(angleAlpha)
                    - calculateTextOffsetX(DARTBOARD_NUMBERS[i], FONT_SIZE);
            double pointY1 = CENTER_Y - POSITION_NUMBERS * Math.cos(angleAlpha)
                    + calculateTextOffsetY(FONT_SIZE);

            root.getChildren().add(
                textBuilder
                     .x(pointX1)
                     .y(pointY1)
                     .text(DARTBOARD_NUMBERS[i])
                     .build()
                    );
        }
    }

    private Path createDartboardField(double degreeStart, double degreeEnd, double innerRadius, double outerRadius, String style) {
        double angleAlpha = degreeStart * (Math.PI / 180);
        double angleAlphaNext = degreeEnd * (Math.PI / 180);

        //Point 1
        double pointX1 = CENTER_X + innerRadius * Math.sin(angleAlpha);
        double pointY1 = CENTER_Y - innerRadius * Math.cos(angleAlpha);

        //Point 2
        double pointX2 = CENTER_X + outerRadius * Math.sin(angleAlpha);
        double pointY2 = CENTER_Y - outerRadius * Math.cos(angleAlpha);

        //Point 3
        double pointX3 = CENTER_X + outerRadius * Math.sin(angleAlphaNext);
        double pointY3 = CENTER_Y - outerRadius * Math.cos(angleAlphaNext);

        //Point 4
        double pointX4 = CENTER_X + innerRadius * Math.sin(angleAlphaNext);
        double pointY4 = CENTER_Y - innerRadius * Math.cos(angleAlphaNext);

        Path path = PathBuilder.create()
                .styleClass(style)
                .elements(
                new MoveTo(pointX1, pointY1),
                new LineTo(pointX2, pointY2),
                ArcToBuilder
                         .create()
                         .radiusX(outerRadius)
                         .radiusY(outerRadius)
                         .x(pointX3)
                         .y(pointY3)
                         .sweepFlag(true)
                         .build(),
                new LineTo(pointX4, pointY4),
                ArcToBuilder
                         .create()
                         .radiusX(innerRadius)
                         .radiusY(innerRadius)
                         .x(pointX1)
                         .y(pointY1)
                         .sweepFlag(false)
                         .build())
                .build();
        return path;
    }

    public static void main(String[] args) {
        launch(args);
    }
}
Here you find the complete CSS file for the dartboard application.
.root {
    -fx-background-color: radial-gradient(center 50% 50%, radius 60%, reflect, #ADFF2F, black );
}

.border-line {
    -fx-stroke: yellow;
    -fx-stroke-width: 1;
    -fx-fill: null;
}

.bull-style {
    -fx-stroke: green;
    -fx-stroke-type: inside;
}

.bulls-eye-style {
    -fx-stroke: red;
    -fx-stroke-type: inside;
}

.text-surround {
    -fx-fill: yellow;
    -fx-font-family: Verdana;
    -fx-font-weight: bold;
    -fx-font-size: 20;
}

.double-triple-style-red {
    -fx-fill: red;
    -fx-stroke: yellow;
    -fx-stroke-width: 1;
}

.double-triple-style-green {
    -fx-fill: green;
    -fx-stroke: yellow;
    -fx-stroke-width: 1;
}

.field-style-dark {
    -fx-fill: black;
    -fx-stroke: yellow;
    -fx-stroke-width: 1;
}

.field-style-light {
    -fx-fill: lemonchiffon;
    -fx-stroke: yellow;
    -fx-stroke-width: 1;
}
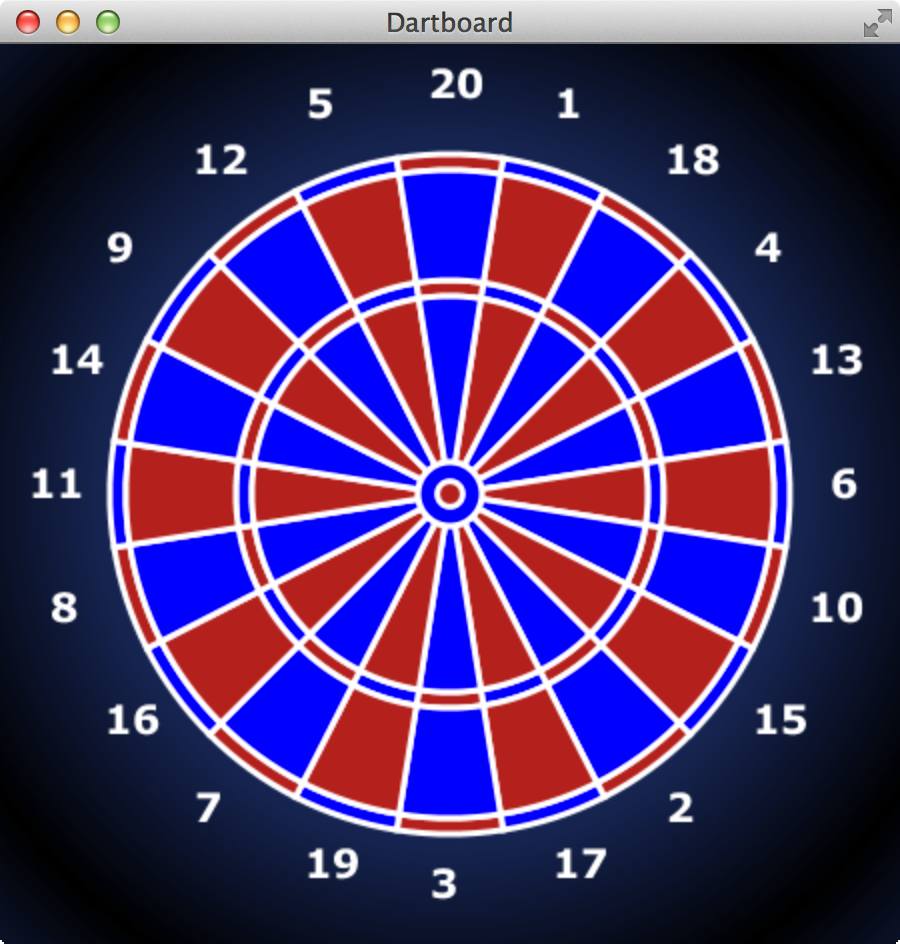
If you want to change the appearance of the dartboard you can simply adapt the CSS file. For example you want to style an electronic dartboard like this:
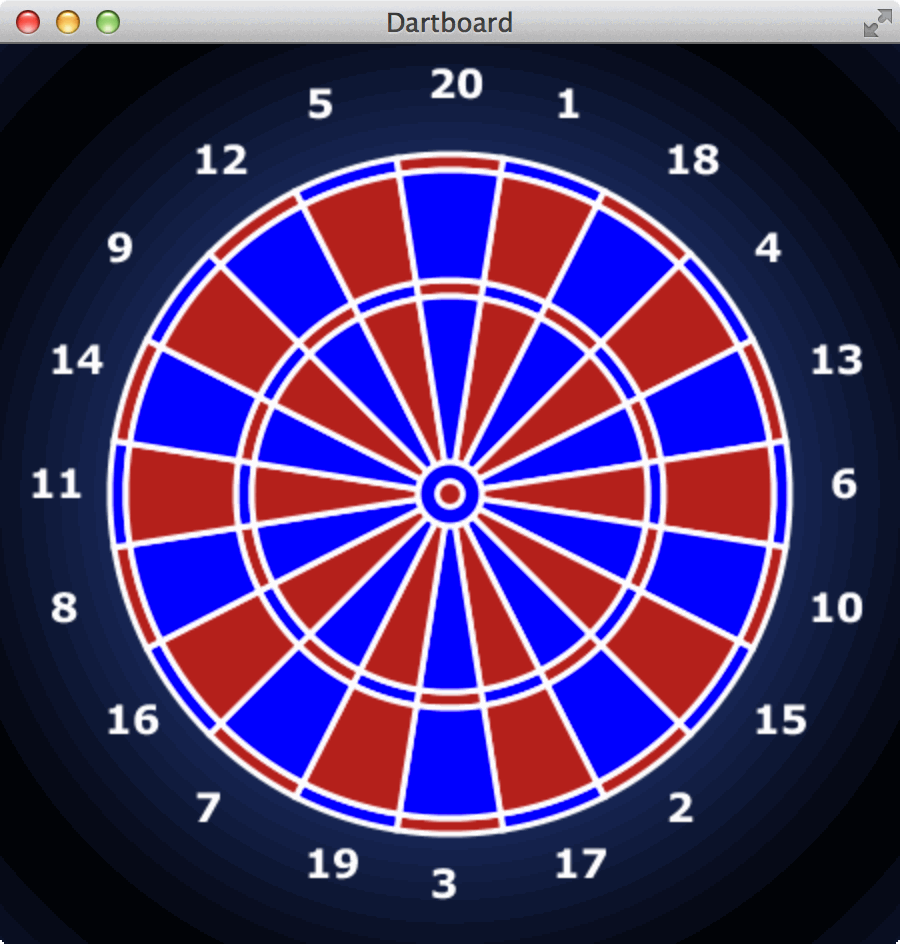
Simply change the colors and increase the stroke-width of the borders.
.root {
    -fx-background-color: radial-gradient(center 50% 50%, radius 60%, reflect, royalblue, black );
}

.border-line {
    -fx-stroke: white;
    -fx-stroke-width: 3;
    -fx-fill: null;
}

.bull-style {
    -fx-stroke: blue;
    -fx-stroke-type: inside;
}

.bulls-eye-style {
    -fx-stroke: firebrick;
    -fx-stroke-type: inside;
}

.text-surround {
    -fx-fill: white;
    -fx-font-family: Verdana;
    -fx-font-weight: bold;
    -fx-font-size: 20;
}

.double-triple-style-red {
    -fx-fill: firebrick;
    -fx-stroke: white;
    -fx-stroke-width: 3;
}

.double-triple-style-green {
    -fx-fill: blue;
    -fx-stroke: white;
    -fx-stroke-width: 3;
}

.field-style-dark {
    -fx-fill: blue;
    -fx-stroke: white;
    -fx-stroke-width: 3;
}

.field-style-light {
    -fx-fill: firebrick;
    -fx-stroke: white;
    -fx-stroke-width: 3;
}
And if you have too much time you can animate the dartboard. ;-)
For this animation I used a Timeline. I described how to use a Timeline in the article JavaFX - Animation of Circles with a Timeline.
The source code for the animation cannot be published because it is to ugly...