
27.07.2013
JavaFX - Lottery Wheel
This article shows how to use TranslateTransitions, FadeTransitions, Timelines and Timeline chaining to implement a simple lottery wheel where names rotate around a point. The wheel reduces its speed continuously and at the end the winner name is highlighted. The names are loaded from a simple text file and positioned around the middle point. The winner is indicated by an arrow which is created with a Path. The Font size and the Color of the names depends on the angle where they are placed around the circle.
Hint: The source code is available at GitHub. The link is at the end of the text.
The following video shows the Lottery Wheel in action:
I divided the application into the following parts:
- Calculate the points around the center where the names should be positioned
- Create a bunch of timelines with increasing duration
- Use transitions to animate the movements of the names
- Format the names depending on angle where they are placed
- Draw an arrow and a
Rectanglewith round edges to highlight the winner - A CSS file for the styling
- Load and shuffle the names (Didn't explain that in the article. Code at GitHub.)
General hints
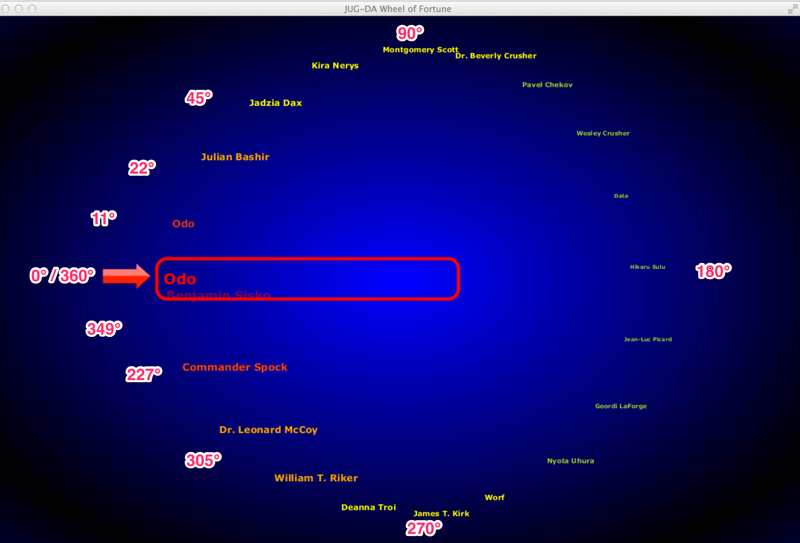
The following screenshot shows the lottery wheel and the angles I used to position the names. The angle with the degree 0 is on the left hand side where the arrow and the rectangle is placed. Keep in mind that normally this is the angle with 270 degrees. The angles are rotated by 270 degrees clockwise.
Position the names around the center
The following code calculates the points where the names should be positioned around the center. Important is the startAngleDegree because the rotation should start at an angle of 270 degrees.
First you have to divide 360 degrees by the number of names to determine the rotation angle. E.g. if you have 36 names every name is rotated by 10 degrees. So it is possible that the distance between the names are equal.
If you want to use sine (Math.sin()) and cosine (Math.cos()) you have to calculate the radian value of the degree value. This done by multiplying the angle with Math.PI / 180.
All calculated points and degrees are stored in a List of Points.
	private List<Point> calculatePoints(int points, double centerX, double centerY, double radius) {
		List<Point> pointList = new ArrayList<>();

		double rotateAngleDegree = 360d / (double) names.size();

		double startAngleDegree = 270;
		for (int rotationStep = 0; rotationStep < points; rotationStep++) {
			double degreeStart = rotationStep * rotateAngleDegree;

			double angleAlpha = (degreeStart + startAngleDegree) * (Math.PI / 180);
			Point p = new Point();
			p.x = CENTER_X + ORBIT * Math.sin(angleAlpha);
			p.y = CENTER_Y - ORBIT * Math.cos(angleAlpha);
			p.position = rotationStep;
			p.angle = degreeStart;
			pointList.add(p);
		}

		return pointList;
	}
To store the points a simple data structure Point is used. Nothing special. No getters or setters.
	class Point {
		double x;
		double y;
		int position;
		double angle;

		public String toString() {
			return position + " " + x + " " + y + " " + angle;
		}
	}
Create the Timelines
One important part is the creation of the Timeslines:
		// Number of rotations per timeline
		int cyclesPerTimeline = 5;

		// Create timeline with different durations to slow down the wheel
		// Timeline chaining
		Timeline nextTimeline = null;

		for (int numberOfTimelines = 10; numberOfTimelines > 0; numberOfTimelines--) {
			final KeyFrame duration = new KeyFrame(Duration.millis(100 * numberOfTimelines));
			nextTimeline = createTimeline(root, duration, nextTimeline);
			nextTimeline.setCycleCount(cyclesPerTimeline);
		}
Every timeline animation is repeated for cyclesPerTimeline (e.g. 5). In this example 10 timeslines are created. For every timeline a duration in milliseconds is defined. Because the lottery wheel should slow down, the duration each timeline needs increases.
In line 10 the method createTimeline is called. Important is the parameter nextTimeline. This is the timeline which will be started when the previous timeline has finished. This functionality is realized with the method setOnFinished in line 13 below (highlighted).
private Timeline createTimeline(final Pane root, final KeyFrame duration, final Timeline nextTimeline) {
	final Timeline timeline = new Timeline(new KeyFrame(Duration.ZERO, new EventHandler<ActionEvent>() {

		@Override
		public void handle(ActionEvent event) {

            moveNames(duration);

        }
	}), duration);

	// Start next timeline on finish
	timeline.setOnFinished(new EventHandler<ActionEvent>() {
		public void handle(ActionEvent event) {

            handleNextTimelineAndWinner(root, nextTimeline);

		};
	});

	return timeline;
}
Using Transitions
The transitions to move the names from one position to the next are part of the method moveNames.
private void moveNames(final KeyFrame duration) {
	for (Text name : names) {
		Point nextPoint = getNextPoint((Integer) name.getUserData());
		TranslateTransition move = TranslateTransitionBuilder.create()
		         .node(name)
		         .fromX(name.translateXProperty().doubleValue())
		         .fromY(name.translateYProperty().doubleValue())
		         .toX(nextPoint.x)
		         .toY(nextPoint.y)
		         .duration(duration.getTime())
		         .build();

		formatText(name, nextPoint);

		ParallelTransition parallelTransition = new ParallelTransition();
		if (nextPoint.position==0) {
			// Make the text invisible
			FadeTransition fadeTransition = new FadeTransition(duration.getTime(), name);
			fadeTransition.setFromValue(1.0f);
			fadeTransition.setToValue(0.3f);
			parallelTransition.getChildren().add(fadeTransition);
		} else if(nextPoint.position==1) {
			// Show the name at the arrow
			arrowText.setText(name.getText());

			// Make the text visible
			FadeTransition fadeTransition = new FadeTransition(duration.getTime(), name);
			fadeTransition.setFromValue(0.3f);
			fadeTransition.setToValue(1f);
			parallelTransition.getChildren().add(fadeTransition);
		}

		parallelTransition.getChildren().add(move);
		parallelTransition.playFromStart();

		name.setUserData(((Integer) name.getUserData()) + 1);

		if (((Integer) name.getUserData()) > points.size() - 1) {
			name.setUserData(0);
		}
	}
}
Important is that the position of the name is stored in the userData of the Text object. This value is used to deternine the next Point. For every name object a TranslateTransition is used to move the text from the actual point (including the translations used before) to the next point.
If the name is moving to the winning position a FadeTransition is used to make the text nearly invisible. If the name is moving from the winning position to the next position the text will be visible again. (I wanted to use the FadeTransition :-) )
Both transitions are executed parallel with a ParallelTransition. The method getNextPoint is nothing special:
private Point getNextPoint(int positionRect) {
	return positionRect + 1 >= points.size() ? points.get(0) : points.get(positionRect + 1);
}
Timeline chaining
The part where I connect the timelines I called Timeline chaining. I'm not sure if this is the best way to slow down an animation, but I liked the solution. :-)
The method handleNextTimelineAndWinner calls the next timeline, if there is one. Otherwise it was the last timeline in the chain and the winner can be displayed.
We have to make the winnerName visible with a FadeTransition. Remove the arrowText, switch the styling and position the text.
private void handleNextTimelineAndWinner(Pane root, Timeline nextTimeline) {
	if (nextTimeline != null) {
		// Start the next timeline
		nextTimeline.play();
	} else {
		// Only executed if the last timeline is reached

		// Make the text visible again
		FadeTransition fadeTransition = new FadeTransition(Duration.millis(200), winnerName);
		fadeTransition.setFromValue(0.3f);
		fadeTransition.setToValue(1f);
		fadeTransition.playFromStart();

		root.getChildren().remove(arrowText);

		// If it was the last timeline in the chain
		// highlight the name of the winner
		winnerName.setId("winnertext");
		winnerName.setTranslateY(0);
		winnerName.setY(5);
	}
}
Formatting the Text
The method formatText is used to format the names which rotate around the center. Depending on the angle the Text changes its color and size. If you recall the screenshot with the angles above the point.angle used in the if-statements in the following method are more comprehensible.
Yes, the variable angle with the degree angle could be replace by radian degrees, but this solution is better to maintain.
private void formatText(Text name, Point point) {
	Font font;
	if (point.angle == 0) {
		font = Font.font("Verdana", FontWeight.BOLD, FONT_SIZE * 1.8);
		name.setFill(Color.RED);
		winnerName = name;
	} else if (point.angle > 349 || point.angle < 11) {
		font = Font.font("Verdana", FontWeight.BOLD, FONT_SIZE * 1.6);
		name.setFill(Color.ORANGERED);
	} else if (point.angle > 327 || point.angle < 22) {
		font = Font.font("Verdana", FontWeight.BOLD, FONT_SIZE * 1.5);
		name.setFill(Color.ORANGERED);
	} else if (point.angle > 305 || point.angle < 45) {
		font = Font.font("Verdana", FontWeight.BOLD, FONT_SIZE * 1.4);
		name.setFill(Color.ORANGE);
	} else if (point.angle > 292 || point.angle < 67) {
		font = Font.font("Verdana", FontWeight.BOLD, FONT_SIZE * 1.3);
		name.setFill(Color.YELLOW);
	} else if (point.angle > 270 || point.angle < 90) {
		font = Font.font("Verdana", FontWeight.BOLD, FONT_SIZE * 1.2);
		name.setFill(Color.YELLOW);
	} else if (point.angle > 247 || point.angle < 112) {
		font = Font.font("Verdana", FontWeight.BOLD, FONT_SIZE * 1.1);
		name.setFill(Color.YELLOW);
	} else if (point.angle > 225 || point.angle < 135) {
		font = Font.font("Verdana", FontWeight.BOLD, FONT_SIZE * 1);
		name.setFill(Color.YELLOWGREEN);
	} else if (point.angle > 202 || point.angle < 157) {
		font = Font.font("Verdana", FontWeight.BOLD, FONT_SIZE * 0.9);
		name.setFill(Color.YELLOWGREEN);
	} else {
		font = Font.font("Verdana", FontWeight.BOLD, FONT_SIZE * 0.8);
		name.setFill(Color.YELLOWGREEN);
	}
	name.setFont(font);
	return;
}
Using Paths
The following method draws the arrow with a Path. First the top of the arrow is drawn and second the bottom of it. The colors are defined in the css files and the styleClass arrowStyleUp and arrowStyleDown is used.
Keep in mind that this solution is not very maintainable. A better way to draw such objects is using an external vector drawing program (e.g. InkScape) and export the coordinates. These coordinates can be used as input for the Path.
private void paintArrow(Pane root) {
	double rightSpace = WIDHT / 2 - ORBIT - 90;

	Path path = PathBuilder.create()
			.styleClass("arrowStyleUp")
			.elements(
					new MoveTo(rightSpace, CENTER_Y - 22),
					new LineTo(rightSpace + 50, CENTER_Y - 22),
					new LineTo(rightSpace + 50, CENTER_Y - 30),
					new LineTo(rightSpace + 70, CENTER_Y - 12),
					new LineTo(rightSpace, CENTER_Y - 12),
					new LineTo(rightSpace, CENTER_Y - 22)
				).build();

	root.getChildren().add(path);

	path = PathBuilder.create()
			.styleClass("arrowStyleDown")
			.elements(
					new MoveTo(rightSpace, CENTER_Y - 12),
					new LineTo(rightSpace + 70, CENTER_Y - 12),
					new LineTo(rightSpace + 50, CENTER_Y + 6),
					new LineTo(rightSpace + 50, CENTER_Y - 2),
					new LineTo(rightSpace, CENTER_Y - 2),
					new LineTo(rightSpace, CENTER_Y - 12)
					).build();

	root.getChildren().add(path);

}
Putting all together
The start method puts all things together and draws the Rectangle with the rounded edges.
@Override
public void start(Stage primaryStage) {
	final Pane root = new Pane();

	// Load all name from the file
	names.addAll(loadNames(new File("names.txt")));

	shuffleNames();

	// Calculate all points where the names should be positioned.
	points = calculatePoints(names.size(), CENTER_X, CENTER_Y, ORBIT);

	// Number of rotations per timeline
	int cyclesPerTimeline = 5;

	// Create recursive timeline to slow down the wheel
	// Timeline chaining
	Timeline nextTimeline = null;

	for (int numberOfTimelines = 10; numberOfTimelines > 0; numberOfTimelines--) {
		final KeyFrame duration = new KeyFrame(Duration.millis(100 * numberOfTimelines));
		nextTimeline = createTimeline(root, duration, nextTimeline);
		nextTimeline.setCycleCount(cyclesPerTimeline);
	}

	arrowText = new Text("Winner");
	arrowText.getStyleClass().add("arrow-text");
	arrowText.setX(250);
	arrowText.setY(CENTER_Y);

	Rectangle rectangle = new Rectangle();
	rectangle.getStyleClass().add("rectangle");
	rectangle.setX(240);
	rectangle.setY((HEIGHT-75)/2);
	rectangle.setWidth(450);
	rectangle.setHeight(60);
	root.getChildren().add(rectangle);

	paintArrow(root);
	root.getChildren().addAll(names);
	root.getChildren().add(arrowText);

	Scene scene = new Scene(root, WIDHT, HEIGHT);

	primaryStage.setTitle("JUG-DA Wheel of Fortune");
	primaryStage.setScene(scene);
	primaryStage.getScene().getStylesheets().add("rotatingNames");
	primaryStage.show();

	nextTimeline.play();
}
CSS files
If you want to change the colors of the background, the arrow or the rectangle you can do this in the css file:
.root {
     -fx-background-color: radial-gradient(center 50% 50%, radius 60%, reflect, #ADFF2F, black );
     -fx-background-color: radial-gradient(center 50% 50%, radius 60%, reflect, BLUE, black );
}

#winnertext {
    -fx-font: 40px Tahoma;
    -fx-fill: linear-gradient(from 0% 0% to 100% 200%, repeat, #ff00ff 0%, GREEN 50%);
    -fx-stroke: YELLOW;
    -fx-stroke-width: 1;
}

.arrowStyleUp {
	-fx-stroke: #ff7e79;
	-fx-fill: #ff7e79;
    -fx-stroke-width: 1px;
}

.arrowStyleDown {
	-fx-stroke: #ff2600;
	-fx-fill: #ff2600;
    -fx-stroke-width: 1px;
}

.arrow-text {
	-fx-fill: RED;
	-fx-font-family: Verdana;
    -fx-font-weight: bold;
    -fx-font-size: 22;
}

.rectangle {
	-fx-stroke: RED;
	-fx-fill: TRANSPARENT;
	-fx-stroke-width: 5;
	-fx-arc-width: 30;
	-fx-arc-height: 30;
}
Source code at GitHub
The source code can be found at GitHub: GitHub JavaFX-LotteryWheel